
Every winter the same complaints show up. The battery that lasted three months now dies in three weeks. The lens is fogged. The camera says it’s offline, then wakes up at noon when the sun hits it. None of this means the camera is defective. Cold changes how batteries, seals, lenses, and sensors behave, and most of it can be planned around.
Here’s what’s actually happening, and where to mount things so winter doesn’t win.
Why Batteries Lose Capacity Below Freezing
A battery is a chemical reaction in a box, and cold slows chemical reactions down. In a lithium cell, the ions move more sluggishly through the electrolyte and internal resistance climbs. The cell can still hold its charge, but it can’t deliver it as easily.
The result is lower usable capacity, and it shows up fast. Around -10°C (14°F), many lithium cells deliver noticeably less than they do at room temperature, and the loss deepens as it gets colder. Exact numbers vary by chemistry and cell quality, so treat any single figure with suspicion.
Two things make it worse for cameras:
- Voltage sag under load: when the camera wakes to record, it pulls a burst of current. A cold cell’s voltage dips under that burst, and if it dips below the cutoff, the camera shuts down even though the battery still has charge in it.
- Protection circuits: rechargeable packs include electronics that cut off output or refuse to charge outside a safe temperature range. That’s a safety feature, and it’s why a camera can go dark in the cold, then work again after warming up.
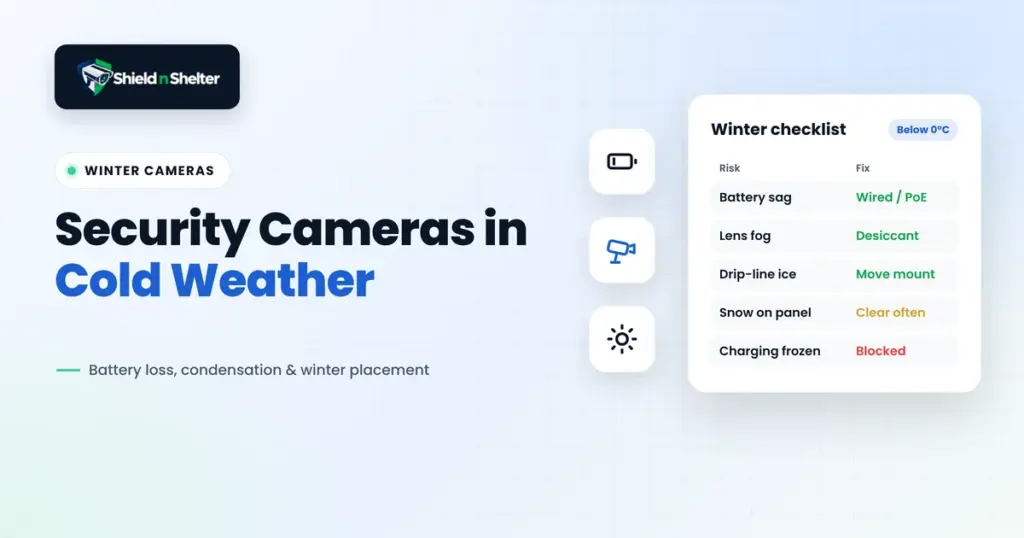
One more detail worth knowing: charging a lithium-ion battery below 0°C (32°F) can cause lithium plating, which permanently damages the cell. Well designed cameras block charging when it’s too cold. That matters for solar panels, which we’ll get to. The same cold effect is a big factor in smart lock battery drain.
Operating Ratings vs Storage Ratings
Spec sheets list two temperature ranges, and they mean very different things.
- Operating temperature: the range in which the camera is designed to work normally. Many wire-free cameras list something like -20°C to 45°C (-4°F to 113°F), though plenty are narrower.
- Storage temperature: the range the camera can survive while switched off, usually wider. It tells you nothing about whether the camera will function at that temperature.
The trap is reading the storage number as the performance number. A camera that survives -30°C in a drawer may not record reliably at -25°C on a wall.
Also read the fine print on the battery. The camera body might be rated lower than the battery pack it ships with, and the battery rating is often the real limit. If the two numbers disagree, the narrower one wins.
What IP Ratings Cover (and What They Don’t)
IP ratings get treated as a universal toughness score, and they aren’t. The first digit covers dust, the second covers water. A rating like IP65 means dust tight and protected against water jets, and IP66 and IP67 step up from there.
Here’s what that rating does not promise:
- Ice and snow load: the tests use water, not packed snow or ice pressing against seals and hinges.
- Cold temperatures: ratings are tested at normal temperatures. Rubber gaskets stiffen in deep cold and can seal worse than they did in the lab.
- Condensation: moisture that forms inside the housing isn’t a leak, so the rating doesn’t address it.
- Long term wear: UV, thermal cycling, and years of freeze and thaw aren’t part of the standard test.
So a high IP rating is a good sign, not a guarantee. It tells you the housing was built to keep rain out. It doesn’t tell you how that housing behaves after forty freeze-thaw cycles.
Lens Condensation and Icing
Fogged lenses come from physics, not a defect. Air holds moisture, and when a surface drops below the dew point, that moisture condenses on it. Cold lenses and warm, humid air are the classic recipe.
Condensation tends to show up in a few situations:
- Moisture trapped inside: if the camera was assembled or opened in humid air, that moisture sits in the housing and condenses when the temperature falls.
- Rapid temperature swings: a sunny winter afternoon followed by a freezing night cycles the housing through the dew point again and again.
- Warm electronics: a camera that runs warm against cold glass can fog the inside of the lens, or melt frost and refreeze it.
Icing is the outdoor version. Frost, freezing drizzle, or melting snow that refreezes on the lens blurs everything, and night vision makes it worse because infrared light bounces off ice crystals and washes out the frame.
What helps:
- Keep desiccant or silica packs inside if the housing allows it, and don’t open the camera in humid conditions.
- Choose a sheltered spot so the lens isn’t taking snow or freezing rain directly.
- Wipe the lens in dry conditions and avoid sealing a damp camera back up.
PIR Sensitivity in Cold Air
Here’s a part that surprises people. A passive infrared sensor detects heat contrast, the difference between a warm body and its background. In winter, the background is colder, so the contrast is bigger. In principle, that makes people easier to detect in the cold than on a hot summer day, when the air and walls are close to body temperature.
So detection range can actually improve. Two caveats keep that from being the whole story:
- Clothing hides heat: heavy winter coats insulate, so the surface a PIR sees can be cooler than a bare arm in July.
- Battery cameras sleep more: to protect a cold battery, a camera may extend cooldown periods, cut recording features, or throttle wake behavior. The sensor might fire, but the camera is slower or less willing to answer, which adds to the usual wire-free camera delay.
The sensor isn’t the weak link in winter, the power system is.
Winter Placement Guidance
Where you mount a camera matters more in winter than any setting. A few principles carry most of the weight (our camera placement guide covers the year-round geometry):
- Sheltered mounting: put the camera under an eave, porch ceiling, or soffit where it’s out of direct snow, freezing rain, and wind. A few feet of shelter changes the conditions a lot.
- Avoid direct snow load: flat horizontal surfaces collect snow and ice, which can block the lens or the PIR window, or push the camera off its mount.
- Stay out of roof drip lines: meltwater drips and refreezes, building icicles and ice sheets exactly where the camera sits. A camera under a drip line can end up encased in ice.
- Mind the aim: pointing a lens east or south into low winter sun invites glare and heat swings. Shade it where you can.
- Keep it off bare metal and masonry: cold conductive surfaces pull heat out of the housing faster, which encourages condensation.
When to Switch to Wired or Solar
For the positions where a missed event really matters, like the front door and driveway, consider taking the battery out of the equation for winter.
- Wired or PoE: a camera on constant power doesn’t depend on a cold battery, and PoE cameras with built-in heaters are designed for deep cold. This is the most reliable winter answer.
- Solar: works well in sunny climates, but winter brings shorter days, lower sun angles, and snow on the panel. Remember the charging problem: many cameras won’t charge a frozen battery, so a panel can sit in full sun and deliver nothing.
- Seasonal swap: use battery cameras in sheltered, low stakes spots, and move the critical positions to powered cameras for the cold months.
If you stick with battery cameras, keep expectations honest. Plan on more frequent charging, keep a spare pack indoors, and warm a depleted battery to room temperature before judging how much capacity it has left. And check what happens when your security camera loses Wi-Fi, since winter storms take out the internet too.