
Knowing where to put security cameras matters more than simply adding more devices. A well-placed camera should show who is approaching, where they came from, and what they touched—without wasting its view on sky, roads, neighboring property, or moving trees.
Before you drill a hole on your wall, this blog can help you maximize the coverage of your home security system.
This camera placement guide uses a practical seven-point framework: purpose, position, height, angle, coverage, lightning, and verification. Apply it to every room before you finalize settings or buy more cameras than needed.
Point 1: Define The Purpose
You need to decide on the purpose of the camera, whether it is intended to identify a person, observe movement across a yard, monitor a doorway, verify a package, or provide a wide overview.
It’s important since Identification cameras need a tighter view and a manageable distance. Overview cameras can use a wider field of view but may show less facial detail.
Problems begin when one camera is expected to perform both jobs from an unsuitable position. Thus it is important to determine the camera’s height, lens coverage, angle, and distance from the target.
Point 2: Choose the Position
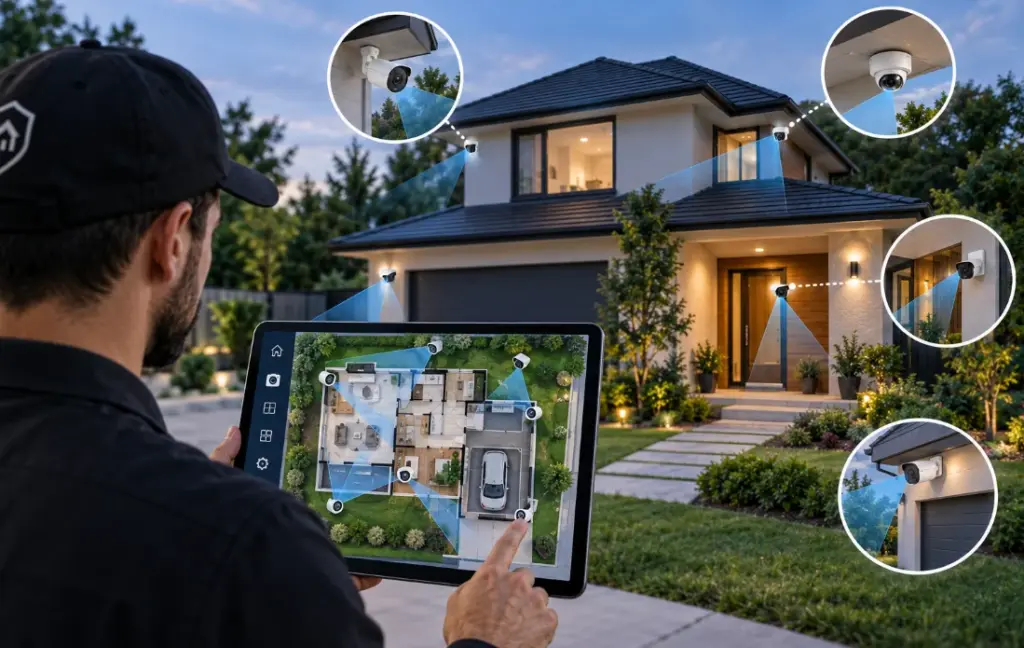
Place the cameras where it is needed, not just anywhere. The priority should be on ground-floor doors, garage approaches, first-floor windows, side paths, stairways, and gates.
For outdoor coverage, you can use overlapping views at critical places. You can use one camera to establish that someone entered the property, while a second camera can provide a clearer view of the person’s face or direction of travel.
You can do Corner mounting for rectangular rooms and open areas as it creates a broader diagonal view. Remember, a camera should not be hidden behind an obstruction, aimed through foliage, or placed where the wall, roof, or door frame blocks part of the image.
Point 3: Set the Height
For exterior installations, a height between 8-10 feet gives you a balance between coverage and identification detail. If the camera is mounted too low, it is easier to tamper with. Conversely, a camera too high will show you the top of the head, not the face.
If you want identification view:
Mount the camera near the height of the upper door frame or slightly above it.
Keep the target area close enough for useful facial detail.
Don’t place the camera directly overhead when a side position can show the face more naturally.
For an Overview view:
A higher position is better for yards, driveways, and wide outdoor areas.
Use another camera if the area requires both general coverage and identification.
You have to accept that increased height can reduce close-up detail directly below the lens.
Point 4: The Correct Angle
For residential cameras, it is suggested to have the camera angles at 15-30 degrees downward for entry coverage. A slight down tilt is more effective than other angle approaches. Ultimately, the correct angle depends on the camera’s field of view, mounting height, and distance from the target.
You need to avoid setting the angle at the horizon and open sky, strong sunlight, reflective glass, headlights or bright outdoor fixtures, and moving tree branches.
To set a camera at the entrance, mount the camera slightly to one side rather than directly on top of the entrance. If you don’t want the camera to capture just the top of the heads, a cross-angle approach is what you need to consider.
Point 5: Calculate the Coverage
Remember, a camera’s image is not a flat rectangle, but its coverage widens with distance. A wide lens will cover more area but will give less edge details. To reach farther and get a better view, a narrower view works better.
A reminder! DON’T go for maximum width automatically. A very wide image may include the entire porch but make a face too small to identify. It may also create unnecessary alerts due to its wide motion sensors.
You can divide the zones:
Approach Zone: The path that shows a person coming and going.
Buffer Zone: Extra view in case someone is stepping around the fence.
Recognition Zone: The view area where you can identify a person or an object.
Point 6: Lightning and Privacy
Lightning can make or break any camera placement. Place the cameras under eaves or use nearby lightning that illuminates people from the side than brightening them directly into the lens. Avoid aiming directly at the sun, floodlights, reflective doors, or windows.
The Front door is usually the highest priority location. The main objective from there is to capture the path, the moving folks and their faces.
Again, a height around 8-10 feet and an angle of 15-30 degrees downward is the best. Avoid pointing directly across the street. With too many vehicles and passersby, not only it may trigger unnecessary alerts but also reduce the useful details on the front entrance.
If you have a bigger porch, use a second camera or a different view from another angle. Trying to cover it with one camera, from a far away distance to get the whole porch will sacrifice the details and person recognition.
Keep package placement within the recognition zone, not at the extreme edge of the frame.
In case you have an attached garage, make sure to cover the garage door and the approaching pathway. A camera mounted above or beside the garage opening will give a useful view, but be careful as camera focus directly into bright daylight will create severe back-lighting.
If the Driveway is long, you should use a narrower coverage along the approach path and a different view by the garage entrance. A single wide-angle camera positioned too near the building may show the garage but miss activity at the distant end of the driveway.
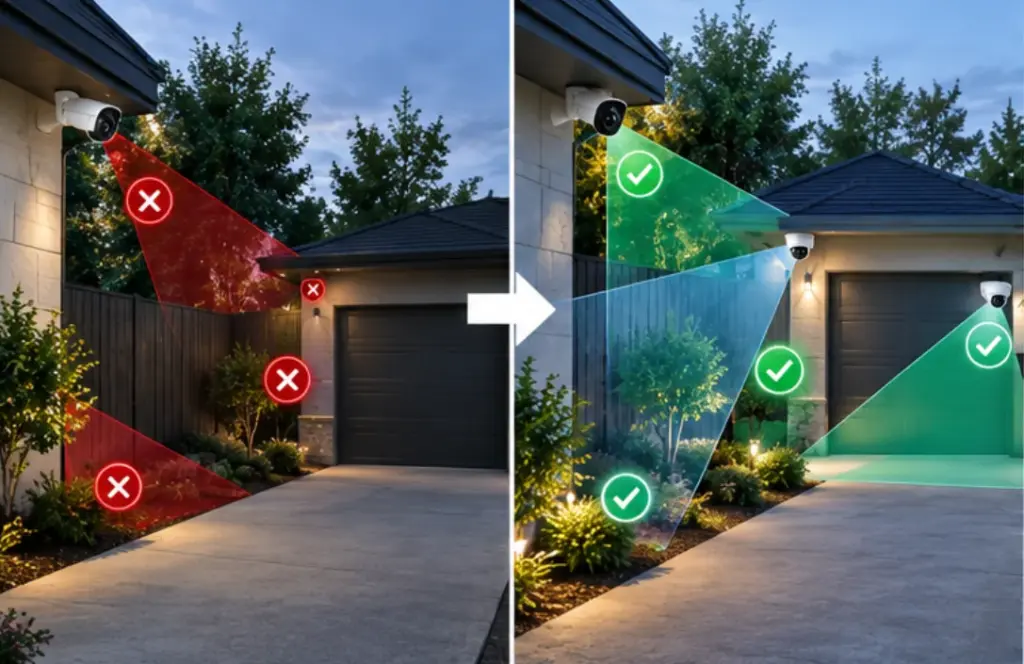
If you have an overhead camera that covers the doorstep but leaves an aside-path blind spot. The camera lens can also include the public road, producing alerts for passing traffic.
To solve this, shift the front camera to a side angle and tilt it down to capture the approach and face zone. Then place a second camera at the rear corner aimed across the side path toward the back gate.
The front camera’s activity zone will exclude the road and the rear camera’s activity zone will exclude the swaying.
There can be many blind spots created by fences, sheds, trees, patio, and changes in ground level in your backyard. To get notice of them, you can start by identifying routes to the back door, side gate, and windows. Mount cameras under eaves or protected corners where they can see along the perimeter without being blocked by the overall structure.
Use two cameras— one for the back door and the other for the broad yard movement in case your area is large. You have to position the perimeter view along the direction of the travel. Here, a cross-angle will provide better body and face details.
Infrared reflections from nearby walls, panels, fences, or even leaves can make a good daytime position but are useless in the dark. So, make sure to check the camera views at night.
The solution is not simply more cameras but better angles. The front view identifies visitors, the rear view covers the route that was previously invisible, lastly the narrower detection zones reduce irrelevant activity.
Windows, particularly, the first-floor windows are common access points, thus they require careful framing.
Rather than pointing through the glass from indoors, position the camera outside the home to monitor the approach to the window. Indoor cameras aimed through windows often suffer from reflections, decreased night visibility, and glare.
Don’t cover areas which are private like bedrooms, bathrooms, or any other privacy expected area. Also, be careful that outdoor cameras do not directly monitor a neighbor’s property, windows, or doors.
Failure in these aspects can lead to legal troubles. Therefore, it is specifically advised by authorities to keep domestic CCTV aimed at the owner’s property. Just in case,
Use privacy masking or digital exclusion zones where a shared path or unavoidable background area enters the frame. Review applicable privacy and surveillance requirements before installation as local rules may vary place to place.
Point 7: Verify before Final Mounting
Finally, before permanently mounting a camera check its live preview. You can use a clamp, temporary tape, or someone to assist you holding the device while you test.
Check these points while testing:
Daylight and nighttime views.
Face visibility at the door.
The entire approach path.
Coverage at the edges of the cone.
Reflections and back-lighting.
Motion alerts from trees, roads, and animals.
Wi-Fi or cable reliability at the chosen point.
Confirm that the camera records the approach before the person reaches. After, check whether the image provides useful detail when the subject is near the frame.
Before Completing the installations, here’s a final checklist for each camera:
Has one defined security purpose.
Covers a priority entry point or vulnerable route.
Is high enough to discourage tampering but low enough for useful detail.
Uses a suitable downward angle.
Keeps important activity inside the recognition zone.
Avoids sky, glare, reflections, and unnecessary public areas.
Does not record private spaces
Works in daylight, darkness, and bad weather.
Has been tested before the mount is permanently tightened.
Front doors are their own case, and the height and angle that work there are covered in where your doorbell camera should actually point. If you are mounting all of this yourself, the DIY planning and installation guide sets out the order to work in.
Need Professional, Brand-Agnostic Guidance?
Shield & Shelter provides 100% independent residential security consulting with zero equipment markups and zero vendor kickbacks.