
False alarms are the worst. One minute your security system is quietly doing its job in the background.
The next your phone is lighting up at 2 a.m. because a delivery truck idled a little too long at the curb, a branch swayed in the wind, or the family cat decided to stretch in just the wrong spot.
This guide covers how to eliminate false alarms at the source: aiming the detection zone away from the street, calibrating sensitivity to real human movement, and verifying the result before you live with it.
After a few weeks of those interruptions, most people start ignoring the alerts or turning the whole thing off. That is exactly the opposite of what you want from a system that is supposed to protect your home.
The frustrating part is that the majority of these false triggers are not the sensor’s fault.
They are usually the result of imperfect placement or sensitivity settings that were never properly tuned for the real-world environment.
Get the detection zone right, calibrate the sensitivity carefully, and teach the unit the difference between someone walking up your front path and ordinary street traffic, and you can dramatically reduce false alarms motion sensor setups generate.
This is not theoretical advice. It is the same process professional installers and experienced DIY-ers use to turn a noisy, unreliable system into one that only speaks up when it actually matters. Let’s walk through it in the order you’d actually tackle the job at your own house.
Detection Zone Placement: Where the Beams Matter Most
PIR (passive infrared) sensors do not “see” the way a camera does. They detect rapid changes in heat across a pattern of invisible beams created by a multi-faceted Fresnel lens on the front of the unit.
Those beams form a three-dimensional detection zone that spreads out from the sensor like a fan or a series of overlapping cones. The exact shape depends on the lens design and mounting height, but the principle is the same: anything warm that crosses enough of those beams will trigger an alert.
Because the technology works this way, placement is everything. Mount most indoor sensors between 6 and 8 feet high. That height puts the densest part of the beam pattern at roughly human torso level while leaving a lower “pet alley” closer to the floor for smaller animals.
Corners are usually the best spot because they give the sensor the widest possible view of the room without wasting coverage on a blank wall.
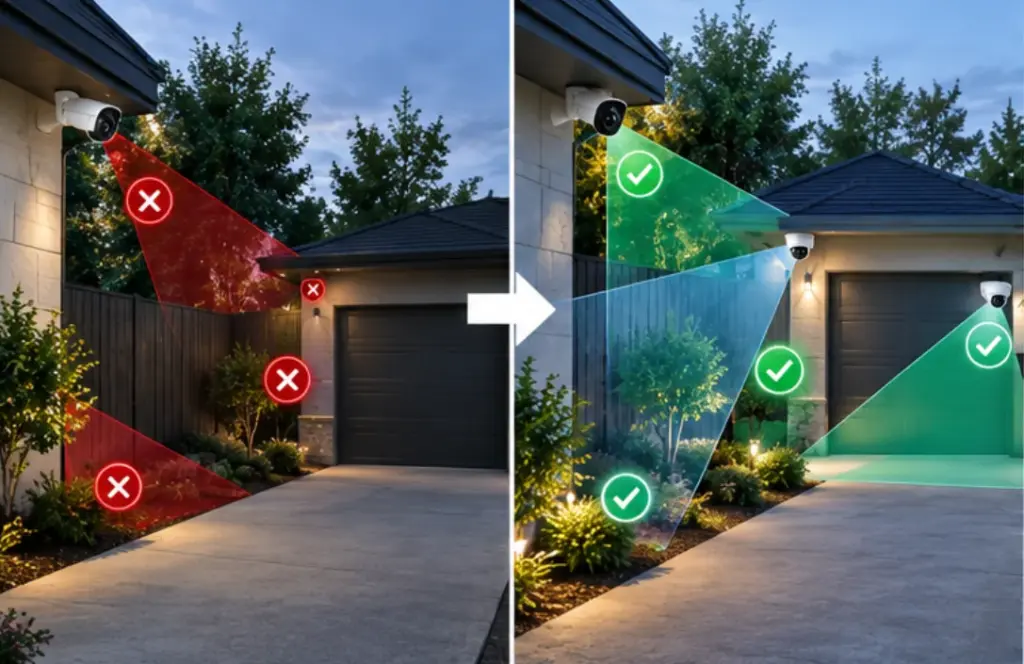
Outdoor sensors or those covering a driveway or walkway often sit a little higher, around 8 to 10 feet, and should be angled slightly downward so the far edge of the zone does not stretch into the street.
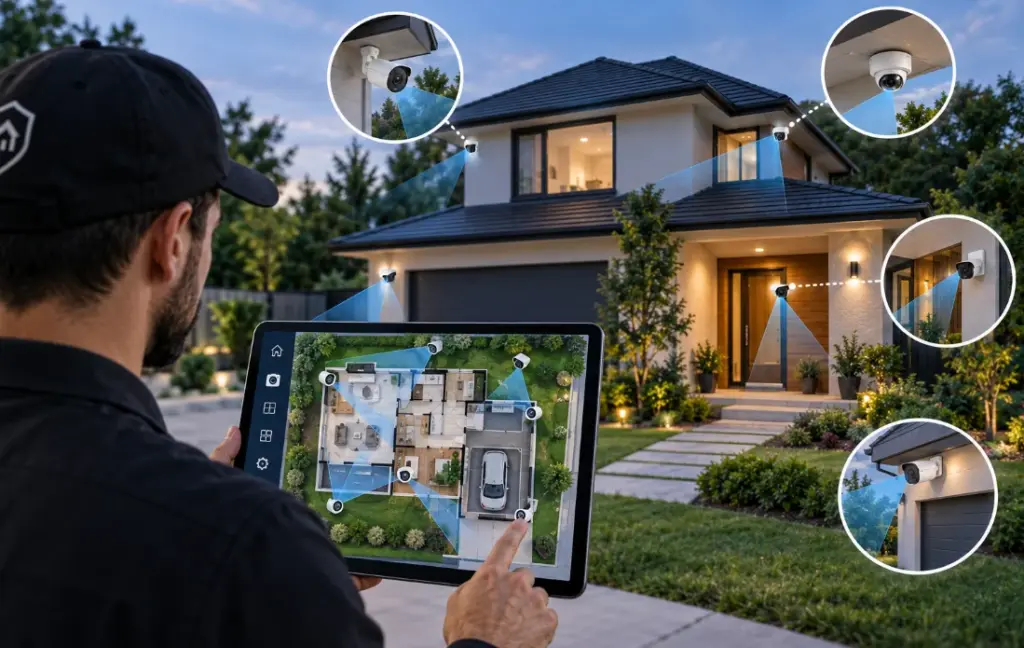
Think in terms of choke points rather than trying to cover every square foot of a room. Hallways, stair landings, the area just inside the front or back door, and the main path from the garage into the house are high-value locations.
An intruder almost has to cross these spots. When you position the sensor, aim it so that normal movement crosses the beams from the side rather than walking straight toward the unit.
PIR sensors are significantly more sensitive to tangential (across-the-field) motion than to radial (straight-at-the-sensor) motion. A person walking across the detection zone trips multiple beams in quick succession and produces a strong, clear signal. Someone walking directly toward the sensor may not register until they are much closer.
The street-traffic problem is one of the most common sources of frustration for outdoor or front-of-house sensors. If any part of the detection zone reaches the public roadway or sidewalk, every warm vehicle engine, every pair of headlights, and every group of pedestrians becomes a potential false trigger. The practical fix is geometric rather than electronic.
Tilt the sensor head downward a few degrees so the outer edge of the coverage pattern cuts off before it reaches the curb. Many models also come with adhesive lens masks or allow you to apply small pieces of opaque tape to the outer facets of the Fresnel lens.
Blocking those outer beams shortens the effective range in the directions you do not care about without reducing sensitivity closer to the house.
A useful reference point that appears in several manufacturer placement and tuning frameworks is Pin 05. On a number of popular PIR modules, the sensitivity and pet-immunity options are controlled by small jumper pins on the circuit board.
The configuration that places the jumper across the middle and bottom pins (often labeled or diagrammed near pin position 5 in the documentation) typically selects the lower-sensitivity setting.
This reduces the maximum detection distance, commonly from roughly 30 to 32 feet down to about 19 feet, and makes the unit less reactive to distant or marginal heat sources.
Checking your specific model’s pin table and setting the jumper to that Pin 05-style lower-sensitivity position is a reliable first step when the sensor keeps reacting to street activity.
Sensitivity Calibration: Turning the Noise Down Without Creating Blind Spots
Once the physical zone is aimed correctly, it is time to fine-tune the electronics. Most sensors give you at least one of three controls: a sensitivity potentiometer (a small screw you turn with a screwdriver), DIP switches, or the jumper pins already mentioned.
Some smart sensors move these adjustments into a mobile app, but the principle remains the same.
Start conservative. Set sensitivity to medium or low, then perform a deliberate walk-test. Walk the actual paths you care about (up the driveway, along the front walkway, across the porch, through the main hallway) at a normal pace. Note exactly where the sensor trips and where it stays quiet.
If it misses a normal human approach at the distance you need, increase sensitivity one notch and test again. If it starts reacting to cars two houses away, leaves blowing across the lawn, or heat shimmering from a sunny wall, drop the sensitivity back down and tighten the physical zone a little more.
Many higher-quality sensors also include a pulse-count or multi-zone confirmation setting.
Raising this so the unit needs two or three consecutive beam crossings before it generates an alarm is one of the cleanest ways to ignore brief, distant heat spikes (a car flashing past the outer edge of the zone) while still catching a person who is genuinely moving through the protected area.
This single adjustment often eliminates a large percentage of street-related false alarms without sacrificing real detection.
- Set sensitivity to medium or low before testing anything.
- Walk the paths you actually care about at a normal pace: up the driveway, along the front walkway, across the porch, through the main hallway.
- Note exactly where the sensor trips and where it stays quiet.
- If it misses a normal human approach, raise sensitivity one notch and test again.
- If it reacts to cars two houses away or leaves blowing across the lawn, drop it back down and tighten the physical zone.
- Raise the pulse-count or multi-zone confirmation so two or three consecutive beam crossings are needed before an alarm.
- Live with the settings for a few days, then make small incremental adjustments.
Do not stop after one walk-test. Thermal conditions change throughout the day and across seasons. Morning sun heating a brick wall, afternoon shadows moving across a driveway, and nighttime temperature drops all alter the background infrared landscape.
A setting that feels perfect at noon can become noisy at dusk or overly quiet on a cold winter morning. Live with the new settings for a few days, note any remaining false triggers, and make small incremental adjustments. Most people find the sweet spot after two or three short tuning sessions.
Distinguishing a Walkway Approach from Ordinary Street Traffic
This is where placement and sensitivity work together as a system rather than as isolated tweaks. A well-aimed sensor that treats the walkway and porch as the primary detection path and keeps the public street outside the zone is already halfway to the goal. Layer on a few additional habits and the difference becomes reliable.
Keep the detection zone tight to your property line. The outermost beams should stop short of the curb or public sidewalk. Angle the sensor so that someone walking up the path crosses multiple beams, while cars traveling parallel to the house stay mostly outside those beams.
If your system or camera supports software detection zones, draw them carefully around the approach path and entrance only. Exclude the road entirely.
Some sensors and most modern security cameras also offer a dwell-time or confirmation delay. Requiring the motion to persist for one or two seconds before an alarm is raised filters out the quick heat blip of a vehicle passing at the edge of the zone.
For particularly busy locations, consider stepping up to a dual-technology sensor that combines PIR with microwave or radar. Both technologies must agree before an alarm is generated, which dramatically reduces street-related false triggers while still catching a person approaching the house.
Maintenance and Long-Term Reliability
Even a perfectly tuned sensor will drift over time. Dust, pollen, and spider webs on the lens gradually reduce sensitivity or create odd reflections. A new shrub that grows into the detection zone, a change in HVAC airflow, or a piece of furniture moved against a wall can all reintroduce problems.
Clean the lens every few months with a soft, dry cloth. Recheck the physical aim after any nearby landscaping or construction. And if you have pets, double-check that the pet-immunity setting matches their size and that they cannot jump onto furniture that puts them into the upper beams.
Replace aging sensors every five to seven years. The pyroelectric elements and supporting electronics slowly degrade, and what once was a reliable unit can become either overly sensitive or unresponsive.
How to Eliminate False Alarms: Putting It All Together
The entire process is iterative by design. Place the sensor thoughtfully, aim the detection zone with the street and other noise sources in mind, set the sensitivity (including that Pin 05 lower-sensitivity jumper position when it fits your hardware), walk-test the real paths, live with the results for a few days, and make small adjustments.
Most households that follow these steps end up with a system that only alerts when something genuinely deserves attention.
False alarms do not have to be a permanent feature of home security. With deliberate detection-zone placement, careful sensitivity calibration, and a clear geometric and electronic distinction between your walkway and the street, you can reduce false alarms motion sensor systems produce and restore trust in the alerts that do come through.
Your future self and your neighbors will thank you.
Doorbell cameras are the most common single source of nuisance alerts, and the aiming rule that fixes them is in where your doorbell camera should actually point. If the system is new to you because the house is, the first 24 hours checklist covers what to tune first.
Need Professional, Brand-Agnostic Guidance?
Shield & Shelter provides 100% independent residential security consulting with zero equipment markups and zero vendor kickbacks.