
There are moments when you may have felt lost and confused about the security system in your home. Forget fixing, you may not know what you are dealing with at the first place. And so, here we are. Fixing existing home security system is not that complicated, it usually needs tuning, not replacement. The fastest way to do so, is to audit coverage remove redundancy, and tighten detection so the system successfully and accurately alerts on the events.
Let’s break it down— A home security system should, (i) catch real threats, and (ii) stay quiet when nothing important is happening. If yours is noisy, inaccurate, or full of dead zones, here’s a checklist that will help you without starting from scratch, to correct it and reduce false alarms.
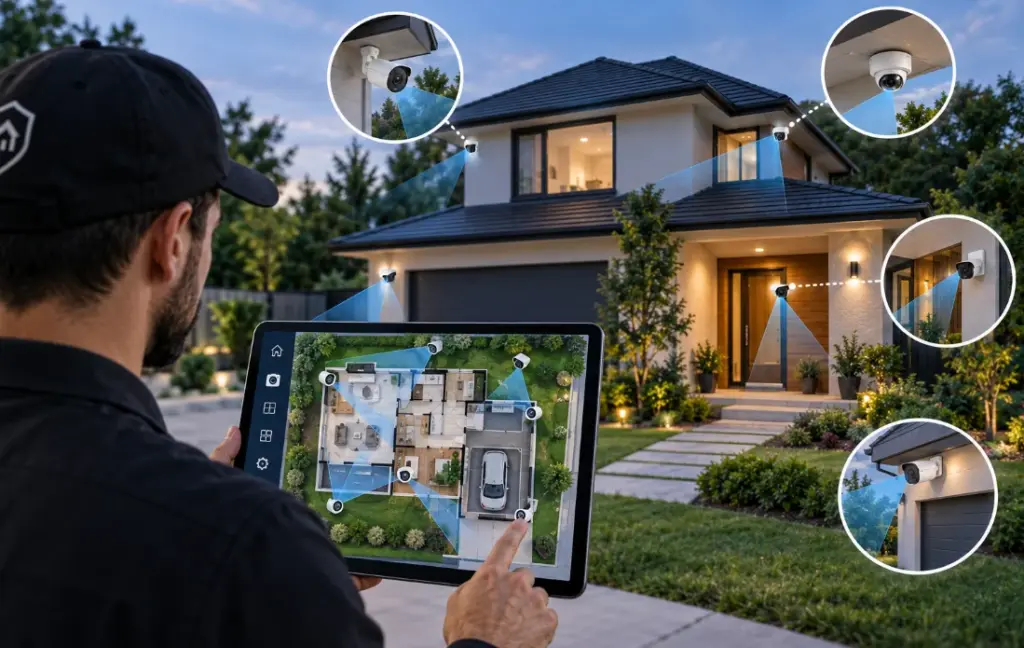
First Map The System
Start by listing every camera, sensor, hub, and app notification source in the home. Then draw a simple property map and mark where each device is installed, what it sees, and what it is supposed to secure. This gives a starting line before you alter any settings.
Ask these questions for each device:
What area is it covering?
What does it miss?
What does it cover twice?
Does it trigger any alerts that is unnecessary for you?
2) Remove the Redundant cameras
In older systems, redundant cameras are common and people may add them when there is an uncertainty lurking in them about their home security. After all, it is better to not take any chances and risk your home. However, two cameras showing the same rooms, porch, or driveway with nearly the same frames is nothing but waste of storage, energy and money.
The goal is to maximize useful coverage, not to maximize the camera count. So you can simply just keep the camera with the clearest identification angles and use the other camera to a blind spot, back corner, or any area that has not been covered yet.
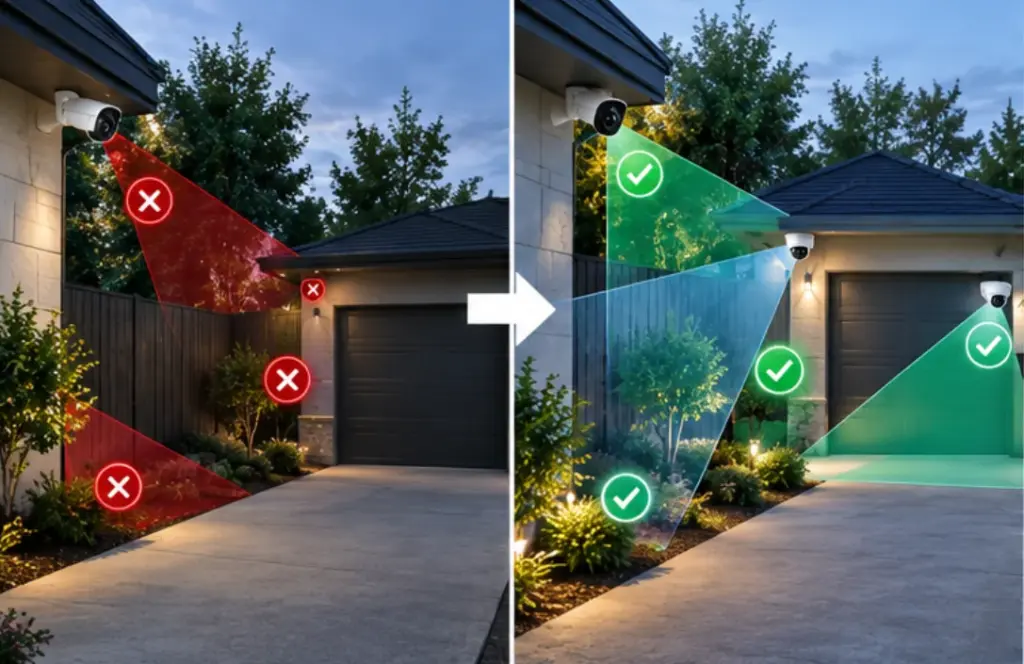
3) Find Blind Spots
The biggest hidden failure in many systems are the blind spots. You can walk around the property during the day and after dark to check the side entrances, fence gaps, garage, corners, and rear approach paths are visible from at least one camera. Look for places where someone could reach a door or window without crossing a visible zone. The site plan specifically treats blind spots analysis and entry point mapping as a core placement work. If a camera cannot see faces, packages, or any form of approach paths clearly, then it is not doing its job properly.
4) Fix Bad Camera Angles
A camera aimed too high often catches sky, tree movement, and other objects. A camera too flat often goes too far out which captures irrelevant motions. To get better angles, tilt the camera slightly downward and center the actual security zone in the frame.
For Outdoor cameras, a moderate downward angle works better than a straight-ahead view because it keeps the target area in focus, also reduces environmental noise. If you are trying to get the view of the gate or any door, the frame should focus the path and the threshold.
5) Lower Alert Fatigue
If a system sends too many notifications, you may go through Alert Fatigue. It can even lower your trust on the system. This can be a serious problem as a real alert may get ignores or muted by habit.
To reduce fatigue:
Turn off nonessential alerts.
Raise sensitivity only where improvement of security is concerned.
Separate “record only” events from “push notification” events.
Limit alerts to people or entry point motion when possible.
A well rounded system frames false alarms reduction as art of keeping the system usable over time.
6) Trim Motion Zones
To reduce false alarms, you can draw activity zones tightly around areas that matter: porch, gate, driveway edge or walkway. Then exclude the areas that create false alarms. Check if your system app supports multiple zones. Remember, a tight zone around is far more useful than wide zone that wastes frames.
7) Cut common False Triggers
Frequent causes of nuisance alerts are trees, rain, reflective surfaces etc. If your cameras keep reacting to these, the fix is usually hardware first, software second.
Common fixes include:
Moving the camera away from reflecting windows.
Keeping branches and leaves out of the detection are.
Avoiding placement near busy streets or sidewalks.
Checking whether headlights or car reflections are causing alerts.
Trim the environment, then tune the settings.
8) Verify Recording and Storage
A system can look healthy while missing clips, overwriting footage too quickly, or even failing to save recordings. Make sure to check storage capacity, backup behavior, retention rules and whether your system continues recording in case of no internet connection. Moreover, if you use cloud recording, check your subscription status, account access, storage limit, and device permissions are active or not. For local storage, confirm the card, hub, NAS, or recorder is writing usable video.
9) Check Sensor Alignment
Test every sensors individually several times. Door and window sensors can fail silently if the magnet and contact are no longer aligned. Change in temperature, loose adhesive, warped frames, and weak batteries can create random alerts or failure in recording. If a sensor is slow, inconsistent, or delayed, replace the battery and remount it before you assume that the whole system is broken.
10) Redesign The System
If you have fixed the weak points, now you can redesign the system. Follow the placement logic and place the cameras by function. A better layout usually has fewer dead zones, fewer duplicate views and fewer false alerts. With this, the system becomes easier to live with and more likely to be used correctly when something real happens.
11) Use Performance Tests
Test the system after every change i real conditions. Walk the driveway, open the front gate, check package drop off, and try to trigger each sensor manually. Review after to check whether the system captured the event cleanly and whether the alert was useful.
To do a practical test you can:
Change one setting.
Observe for three to seven days.
Count false alerts.
Keep the change only if it improves any function accurately.
If you have done well, these fixes make the system quieter, clearer, and more trustworthy. That is usually the difference between a security setup people ignore and one they actually rely on.
Finally, don’t upgrade at random. If your cameras cannot support better zones, if the sensors are unreliable, or if the system lacks modern edge detection, then tuning alone may not be enough. Sometimes the problem is not just setup, it is outdated software. In such cases, rather than changing or upgrading the whole setup, just upgrading specific parts is a cheaper solution.
If the audit does turn up genuine gaps rather than misconfiguration, the cost guide sets out what filling them actually runs at each tier.
Need Professional, Brand-Agnostic Guidance?
Shield & Shelter provides 100% independent residential security consulting with zero equipment markups and zero vendor kickbacks.