
If there’s one thing we’ve learned about home security, it’s this: the best security system doesn’t start with shopping—it starts with planning.
When we first decided to plan for a DIY home security system, we did exactly what most people do. We researched. We opened a dozen browser tabs, watched YouTube reviews, compared camera specs, and almost bought a bundle that looked like a great deal. Then We paused and asked myself a simple question:
“Where would the user even put all of this?”
That one question completely changed our approach.
We realized that home security isn’t about owning the most expensive cameras or filling every corner of your house with smart devices. It’s about understanding your home, identifying its weak spots, and choosing equipment that solves real problems instead of creating unnecessary clutter.
Whether you’re securing a small apartment, a rental, or a large family home, careful planning will save you money, make installation easier, and give you a system that actually works when you need it.
In this guide, we’ll walk you through exactly how we design a DIY home security system blueprint for our clients, from assessing their home’s vulnerabilities to deciding which devices are worth buying and which ones can wait.
Why We Always Start with a Plan
It’s easy to get excited about smart cameras, video doorbells, and motion sensors. After all, they’re the most visible part of any home security setup.
But we’ve learned that buying devices before making a plan usually leads to one of two things: overspending or leaving important areas unprotected.
Imagine buying three outdoor cameras only to realize later that the easiest way into your home is through an unmonitored basement window. Or installing a video doorbell while forgetting about the back patio that no one ever sees.
That’s why our team always starts by looking at the bigger picture.
Before spending a single dollar, we tell our clients to ask themselves:
What am I actually trying to protect?
Where is someone most likely to enter?
Which areas of my home already have good visibility?
Which areas are hidden from neighbors?
How much do I realistically want to spend?
Answering those questions makes every purchasing decision much easier.
Always Walk Around Your Home Like an Intruder
One of the most useful exercises you can do might feel a little strange at first.
Instead of looking at your home as the person who lives there, try to see it through the eyes of someone looking for an easy opportunity.
Walk around the outside of your house asking yourselves questions like:
Which door would I choose if I wanted to avoid being seen?
Are there dark corners around the property?
Could someone reach a window without attracting attention?
Do overgrown bushes provide cover?
Is the garage door always visible from the street?
It won’t take long before you’ll notice things you ignored for years. For example:
A side gate might hide behind a fence. Shrubs . The back patio couldn’t be seen from any neighboring house.
Those observations became the foundation of my security plan.
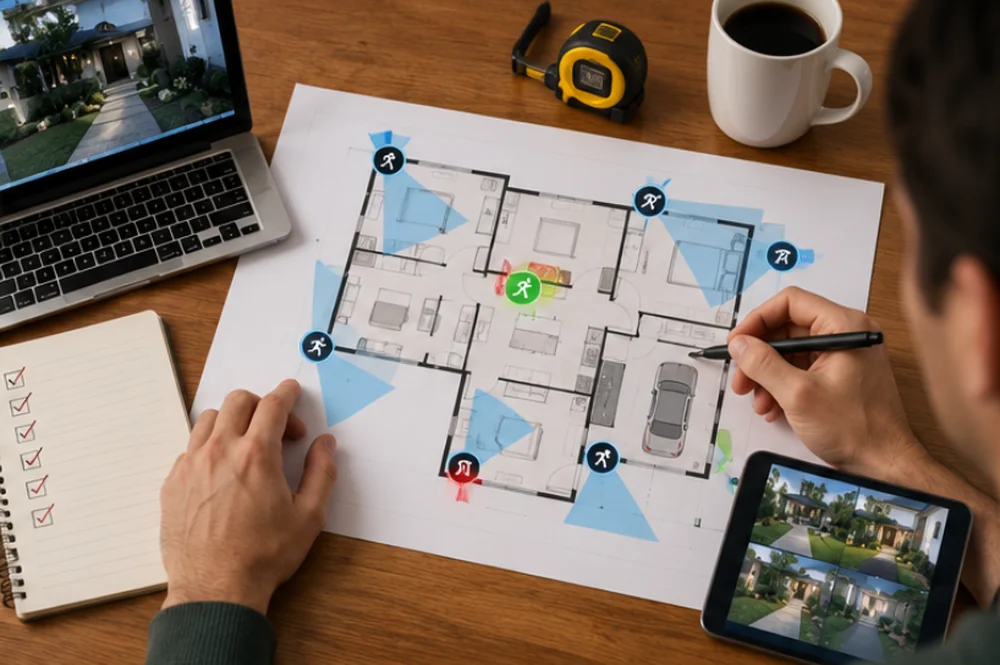
I Sketch a Simple Floor Plan
I’m definitely not an architect, and my floor plans aren’t works of art.
Usually, I grab a piece of paper and draw a rough outline of my home.
I mark the obvious things first:
Front door
Back door
Windows
Garage
Hallways
Staircases
Patio
Balcony
Then I add practical details like where my Wi-Fi router is located and where nearby power outlets are.
This simple sketch helps me visualize where each device should go before I ever take it out of the box.
It also prevents me from buying equipment I don’t actually need.
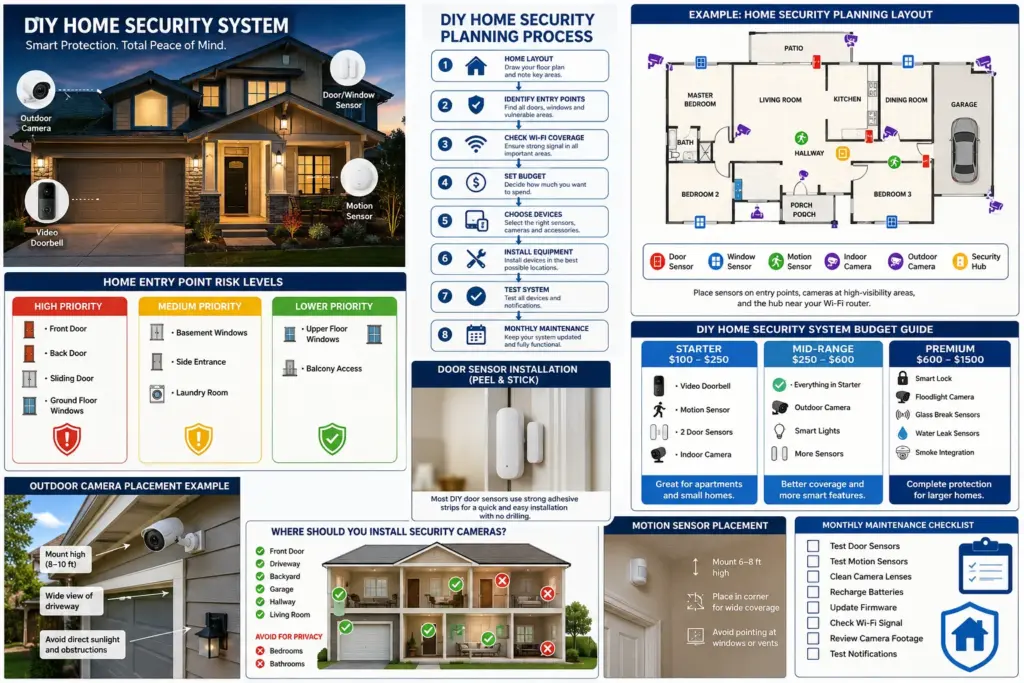
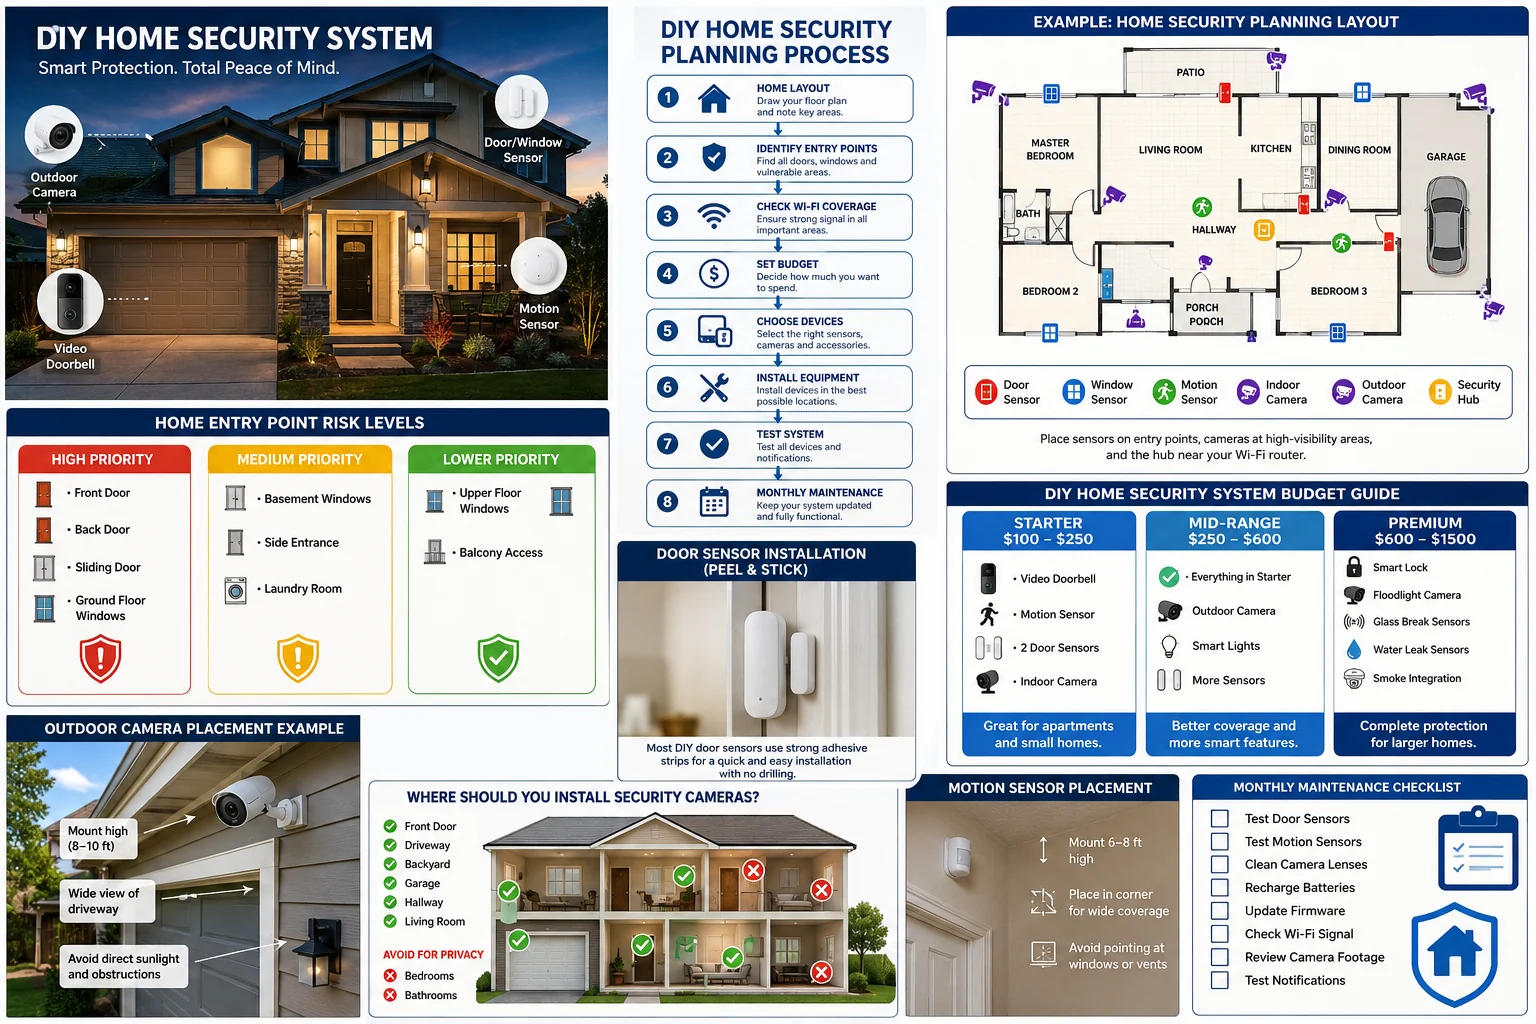
I Focus on the Most Important Entry Points First
One mistake I see people make is trying to secure every inch of their home at once.
I don’t think that’s necessary.
Instead, I start with the places that are most likely to be used.
For me, those are:
The front door
The back door
Ground-floor windows
Sliding glass doors
The garage entrance
If my budget allows, I expand from there.
Second-floor windows usually aren’t my first priority because they’re much harder to access.
By focusing on the highest-risk areas first, I get the biggest improvement without spending a fortune.
I Pay Attention to the Places No One Can See
Something I’ve noticed over the years is that burglars usually don’t choose the most dramatic route—they choose the easiest one.
That often means entering through places that are hidden from view.
Whenever I plan my security system, I spend extra time looking at:
Side yards
Backyards
Hidden patios
Detached garages
Areas behind fences
Poorly lit walkways
These locations often benefit more from a motion-activated light or a single well-placed camera than the front of the house, which is already visible to everyone passing by.
Before Buying Anything, I Check My Wi-Fi
Because most DIY security devices rely on Wi-Fi, I always make sure my connection is strong throughout the house.
There’s no point installing a camera in the backyard if it keeps disconnecting every few hours.
I usually walk around my home with my phone and check the signal in every area where I plan to install a device.
If I notice weak coverage, I’d rather fix that first with a mesh Wi-Fi system or an extender than blame the security equipment later.
I Buy Devices That Solve Problems
One thing I’ve learned is that it’s surprisingly easy to get carried away with smart home gadgets.
Instead of asking myself, “What should I buy?” I ask, “What problem am I trying to solve?”
If I mainly want to know when someone opens a door, sensors make more sense than additional cameras.
If I receive a lot of deliveries, a video doorbell becomes a worthwhile investment.
If I travel often, remote monitoring and smartphone alerts become much more important.
Thinking this way keeps me focused and helps me avoid spending money on features I’ll rarely use.
How I Build My DIY Home Security System
One of the biggest advantages of a DIY system is that I don’t have to buy everything at once.
I can build it gradually.
If I were starting today with a limited budget, I’d begin with:
A video doorbell
Two door sensors
A motion sensor
One indoor camera
That setup covers the areas where most people enter and gives me notifications if someone opens a door or moves inside the house.
As my budget grows, I’d add outdoor cameras, window sensors, smart lighting, and eventually smart locks.
There’s no rush.
A good security system should grow with your needs.
Cameras Are Important, but They Aren’t Everything
People often ask me whether cameras or sensors are more important.
My answer surprises some people.
If I could only choose one, I’d probably start with sensors.
A door sensor immediately tells me that someone has entered.
A camera might show me what happened afterward, but it doesn’t always provide an instant alert unless it’s paired with good motion detection.
The best setup combines both.
Sensors tell me something is happening.
Cameras show me what happened.
Together, they create a much stronger security system.
I Keep Camera Placement Simple
When it comes to cameras, I’ve found that more isn’t always better.
Instead of covering every angle, I focus on locations that provide the most useful view.
Outside, I usually prioritize:
The front entrance
Driveway
Backyard
Garage
Side gate
Inside, I prefer common areas like hallways or the living room.
I intentionally avoid placing cameras in bedrooms or bathrooms. Security should never come at the expense of privacy.
Peel-and-Stick Installation Makes Life Easier
One of my favorite things about modern DIY security products is how easy they’ve become to install.
Many sensors and cameras now use strong adhesive mounts instead of screws.
That means:
No drilling
No wall damage
Faster installation
Easy repositioning
Perfect for renters
Whenever I use adhesive strips, I always clean the surface first and press firmly for about thirty seconds. It’s a small step, but it makes a big difference in how securely everything stays in place.
I Don’t Ignore Lighting
Adding a security camera is great, but sometimes a simple light can be just as effective.
Motion-activated lighting instantly draws attention to unexpected movement, which is often enough to make someone think twice.
I like placing lights near:
Garages
Side entrances
Backyard walkways
Garden paths
They’re affordable, easy to install, and work well alongside cameras.
Digital Security Matters Too
Since most DIY systems connect to the internet, I treat cybersecurity as part of home security.
Whenever I install a new device, I make it a habit to:
Change the default password immediately.
Enable two-factor authentication.
Keep the firmware updated.
Use a strong Wi-Fi password.
Give every account a unique password.
It only takes a few minutes, but it significantly reduces the risk of someone accessing my devices remotely.
I Test Everything Before Calling It Finished
Installing a device isn’t the final step—testing it is.
Every time I add something new, I check that:
Alerts reach my phone.
Motion sensors trigger correctly.
Cameras record properly.
Door sensors respond instantly.
Automations work as expected.
I also test my entire system once a month.
It doesn’t take long, and it gives me peace of mind knowing everything is ready if I ever need it.
Mistakes I’ve Learned to Avoid
Looking back, there are a few lessons I wish I’d known from the beginning.
I no longer:
Buy devices before making a plan.
Ignore Wi-Fi coverage.
Mount cameras too low.
Forget about blind spots.
Skip firmware updates.
Depend only on cameras.
Assume everything works without testing it.
Avoiding these common mistakes has made my security system much more reliable—and saved me from plenty of frustration.
Final Thoughts
Planning a DIY home security system doesn’t have to be complicated. In fact, I’ve found that the simpler my approach, the better the results.
Rather than rushing to buy the latest gadgets, I start by understanding my home, identifying its vulnerable areas, and choosing devices that solve specific problems. Over time, I can always expand the system as my needs or budget change.
For me, that’s the biggest advantage of going the DIY route. I’m not locked into someone else’s package or paying for equipment I don’t need. I can build my security system one piece at a time, knowing that every sensor, camera, and smart device has been chosen with purpose.
At the end of the day, a good home security system isn’t measured by how many devices you own. It’s measured by how well it protects the people and the place that matter most.
Need Professional, Brand-Agnostic Guidance?
Shield & Shelter provides 100% independent residential security consulting with zero equipment markups and zero vendor kickbacks.